The success of your plastic part relies upon many key elements working simultaneously. There are many factors that influence the outcome of your plastic part and should be taken into consideration when designing with plastics as follows:
• Draft Angles
• Wall Thickness
• Fillets and Radii
• Bosses
• Ribs
• Holes/Depressions
• Shrinkage
• Gating
• Vents
• Potential Knit Lines
This quick reference guide will highlight some of the key elements and provide some additional insights on each:
Draft Angles
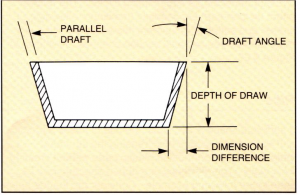
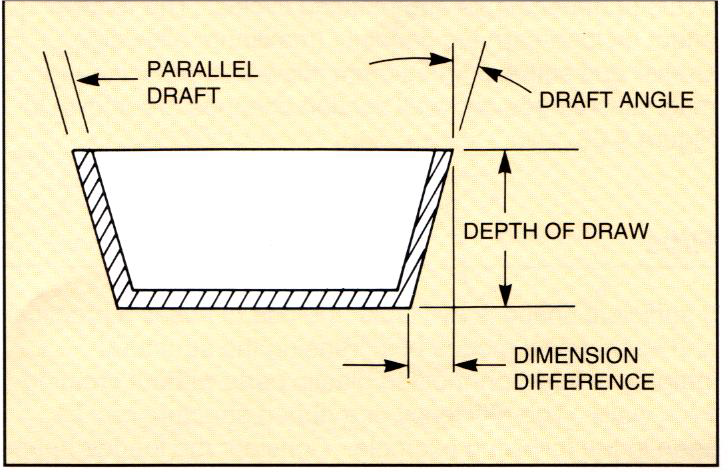
• A typical draft angle is 1º with 1/2º on ribs
• Some draft is better than none
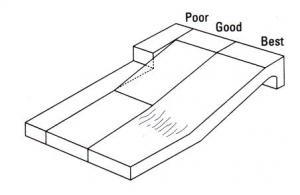
• With minimum draft, fine polish mold in direction of ejection
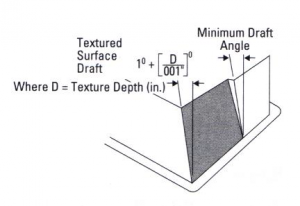
• Allow 1º additional draft for each .001 inch depth in texture
Wall Thickness
• Wall thickness should be kept uniform
-Provides even melt flow and uniform shrinkage
• Core out thick sections
-Provides uniform shrinkage and faster cycle time
• Changes in wall thickness should be transitioned
-Avoids stress concentrations and cooling differences
• Gate into thick sections
-Provides improved packing and reduces stresses
The number one rule for designing with plastics is uniform wall thickness.
Fillets and Radii
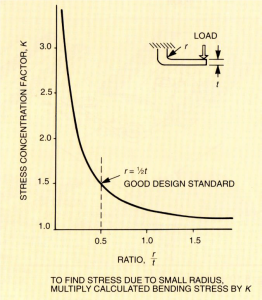
• Fillet radius should be 25-60% of nominal wall thickness
-Avoids stress concentrations
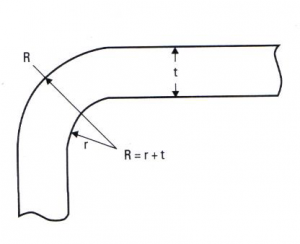
• Outside corner radius should equal inside radii plus the wall thickness
-Helps keep uniform wall thickness and avoid stress concentrations
-Inside radius = 0.5 x wall thickness
-Outside radius = 1.5 x wall thickness
• Sharp corners are the #1 cause of part failure, stress concentrations, poor flow patterns and increased tool wear. Sharp corners should always be avoided!
Bosses
• Bosses are projections designed to accept inserts, self tapping screws, etc. for use in mounting, fastening or assembling parts
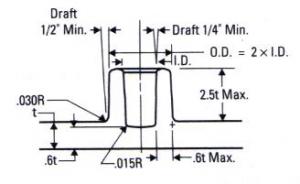
• Typically the boss O.D. = 2 I.D.
-Allows the wall to increase as the size of the boss increases
• Wall thickness at base of boss < 60% of nominal wall
-Reduces sink marks and cycle time
• Boss height < 3 x O.D.
-Minimizes excess mass at bottom of boss and allows for sufficient cooling
of core pin
• Base of boss should be radiused 25 –50% on nominal wall (minimum of .015-inch)
-Minimizes stress concentration in high stress area
Ribs
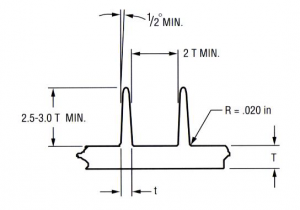
• Base of rib should be 50 –60% of nominal wall thickness
-Avoids sink marks and excess mass
• Maximum rib height of 3 times the nominal wall thickness
-Deep ribs are hard to fill, may stick in mold
• Draft of 1º -1.5º is desirable
-Minimum draft of 1/2º is required for ejection
• Base of rib should be radiused 25 –50% on nominal wall (minimum of .015-inch)
-Minimizes stress concentration in high stress area
• Spacing between 2 parallel ribs should be minimum of 2 times nominal wall thickness
-Avoids hot spots on mold
• The preferred flow of melt is down the length of the ribs
-Flow across ribs can result in trapped gas
Holes and Depressions
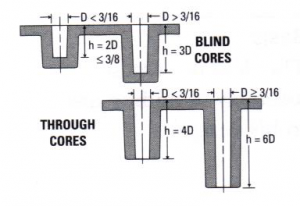
• Blind holes: L/D ratio < 2
-Helps minimize deflection of core pins
• Through holes: L/D ratio < 4
-Because core pins can be supported at both ends the L/D ratio can be longer
• The melt should flow down the length of a slot or depression
-Helps minimize stresses and improves knit line strength
• Distance between two holes or one hole and the edge of the surface should be 2 times the wall thickness or 2 times the hole diameter, whichever is larger
-Provides adequate material for strength, especially if knit lines are present
• Edges and corners of depressions should have a minimum radius of .015-inch
-Aids in molding and strength of the part
Shrinkage
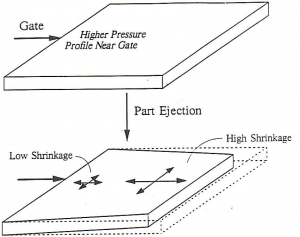
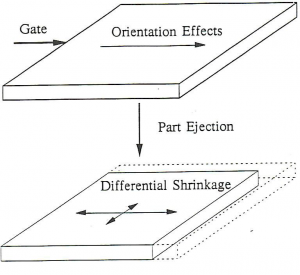
• Shrinkage is an inherent property of the material
• Amorphous materials have lower, more uniform shrinkage than semi-crystalline materials
• Processing conditions, especially mold temperature and pack pressure, can affect shrinkage
• Gate size and design, as well as part and mold design will affect shrinkage
Gating
• Gate thickness should be 50 –80% of the wall thickness. Gate thickness controls packing time.
• Gate width should be twice the gate thickness
• Gate lands should be kept to a minimum
• Gates should be located at right angles to the runner to allow the polymer melt to impinge against the mold wall
• Gates should be located in thick sections of the part
Vents
• Allow air to escape from the mold cavity as the plastic melt flows in
• Help prevent burning or dieseling
• Help prevent mold deposits
• Help prevent incomplete mold fills
• Help prevent slowing down the injection speed
• Amorphous materials can tolerate deeper vents than semi-crystalline materials
• Vents should be ‘draw-polished’ in direction of flow to be self-cleaning
• Runners should be vented at any change of direction
Typical Dimensions:
• L = .03 –.06 inch
• W = .375 –.5 inch
• D1 = .0005 -.003 inch
• D2 = .01 -.04 inch
Potential Knit Lines
• Knit lines occur where to or mold melt fronts come together
-Holes, slots, multiple gates, variations in wall thickness
-Meld lines occur when the melt comes together in the same flow direction
• Knit lines are areas of weakness and should be located in low stress areas
Part Design Summary
Bosses:
• Boss height should be 2.5 times the I.D. of the boss.
• Separate the bosses from the walls in order to maintain a uniform wall.
• The receiving hole diameter of a boss should be equal to the self-tapping screw pitch diameter.
• The boss O.D. should be equal to twice the insert or screw major diameter.
Ribs:
• Reinforcing ribs should not be thicker than 2/3’s the nominal wall thickness. Any thicker will create sink marks.
• The distance between two ribs should not be less than two times the nominal wall.
• A strengthening gusset is typically two times the wall thickness deep, four times the wall thickness tall, and half the wall thickness.
Holes:
• Expect a flow line on a smooth surface when the plastic flow came from a textured surface.
• All holes will create a weldline.
• Any depression that passes 2/3’s of the way through the wall creates a weldline.
• Irregularly shaped or square holes are not recommended.
• The space between two holes should be the greater of two times the wall thickness or two times the hole diameter.
Radius:
• No sharp corners: radius all inside and outside corners.
• The radius of the inside corner of a part should be 50% of the nominal wall.
• The radius of an outside corner of a part should be 150% of the nominal wall.
• Radii can be as large as the design can allow.
• Radii are impractical in certain mold locations such as parting lines or side-cored shutoffs.
• Radius a minimum of 25% of nominal wall at the junction of walls and reinforcing ribs.
Walls:
• Walls should have a uniform thickness throughout the whole design: core out thick sections.
• Must have draft –a good starting point is at least 1 degree of draft per inch. Any draft angle is better than no draft angle.
• Texture –add 1 degree of draft for .001 inch of texture depth.
• If nominal wall thickness must change, the change should be gradual and should not exceed 15% of the nominal wall.
Weld Lines:
• Parts with weld lines are weaker than parts without weld lines.
Interested in obtaining more advice? Reach a Technical Engineer at sales@xcentricmold.com or call (586) 589-4636.
Read more about injection molding best practices.
References
• AMCO Polymers
• Plastics Engineering Handbook,Society of the Plastics Industry, Edited by M. Berins, Van NostrandReinhold, 1991
• Designing With Plastics: The Fundamentals, Hoechst Celanese Design Manual TDM-1, 1992
• Modulus Design Solutions, AlliedSignal Plastics, 1996
• Design Guide, GE Plastics

